
An online image resizer is a tool that lets you change a picture's dimensions right in your web browser. The key difference with modern tools, though, is that they do this without uploading your files to a server. This keeps your data completely private and secure, right on your own device.
Why a Privacy-First Image Resizer Is a Non-Negotiable
In a business world driven by digital assets, even a simple task like resizing a photo can open your company up to serious risks. Most online tools ask you to upload your images to their server, which immediately breaks your data's chain of custody. The moment that file leaves your control, you have no idea who can access it, copy it, or misuse it.
For anyone handling sensitive information, that’s a deal-breaker.
This is where a modern, privacy-first image online resizer completely changes the equation. By processing everything locally in your browser with JavaScript, these tools make sure your images never leave your computer. This client-side approach isn't just a nice feature—it's a core security principle.
The Hidden Dangers of Cloud-Based Tools
When you use a standard online resizer, your data travels across the open internet to a server you know nothing about. This creates several weak points:
- Data Interception: Files can be snagged during upload or download if the connection isn't perfectly secure.
- Server-Side Breaches: That third-party server could get hacked, exposing all the images stored on it. You can learn more about how data is protected in our detailed guide on what is end-to-end encryption.
- Shady Data Policies: Many free tools have vague terms that might give them the right to use or sell your images.
This old model just doesn't work for developers with proprietary app screenshots, marketing teams with pre-launch product photos, or any enterprise user managing confidential visuals.
Comparing Cloud Upload vs In-Browser Image Resizing
A quick look at the core differences between traditional online resizers and modern tools that process images locally in your browser.
| Feature | Traditional Cloud-Based Resizer | Secure Browser-Based Resizer |
|---|---|---|
| Data Privacy | Low. Files are uploaded to a third-party server. | High. Files never leave your device. |
| Security Risk | High. Vulnerable to interception and server-side data breaches. | Minimal. No upload means no risk of external breaches. |
| Speed | Slower. Depends on your internet connection and server load. | Fast. Processing happens instantly using your computer's resources. |
| Offline Access | No. Requires an active internet connection to upload and download. | Yes. Can often be used completely offline after the initial page load. |
| File Size Limits | Often has strict limits due to server storage and bandwidth costs. | Generally no limits, as it depends only on your browser's capability. |
The takeaway is clear: for any serious work, local browser-based processing is the only way to guarantee security and maintain control.
The Big Shift Toward Secure, Local Processing
The demand for truly secure tools is exploding. The global market for photo resizer apps is on track to grow with a 15% CAGR through 2033. While cloud tools are still out there, privacy-focused alternatives are gaining ground fast, especially with data breaches hitting a staggering 8,432 incidents in 2024 alone. You can dig into more insights about this growing market trend on datainsightsmarket.com.
Tools that resize images on the client-side are a perfect fit for enterprises needing to comply with regulations like GDPR. They deliver predictable, secure results that cloud services simply can't promise.
By choosing a browser-based resizer, you eliminate the single biggest point of failure in online image editing: the server upload. Your data stays where it belongs—with you.
This fundamental shift gives teams total data sovereignty without giving up the convenience they need. It's exactly why security-conscious professionals are starting to mandate tools that work offline, entirely within the browser's secure sandbox.
Securely Resizing an Image Right in Your Browser
Using a secure, browser-based image resizer is refreshingly simple. The whole point is speed and safety, making sure your files never have to leave your computer and touch a third-party server.
Let's walk through how to get your images sized perfectly without giving up an ounce of privacy.
First things first, you just need to select your image. Unlike old-school tools that make you upload everything, a client-side resizer works on the file directly on your device. That means zero waiting for uploads or downloads. The moment you pick a file, it’s loaded and ready to go in your browser's own secure space.
This diagram really highlights the difference between the old, insecure way and modern, in-browser processing.
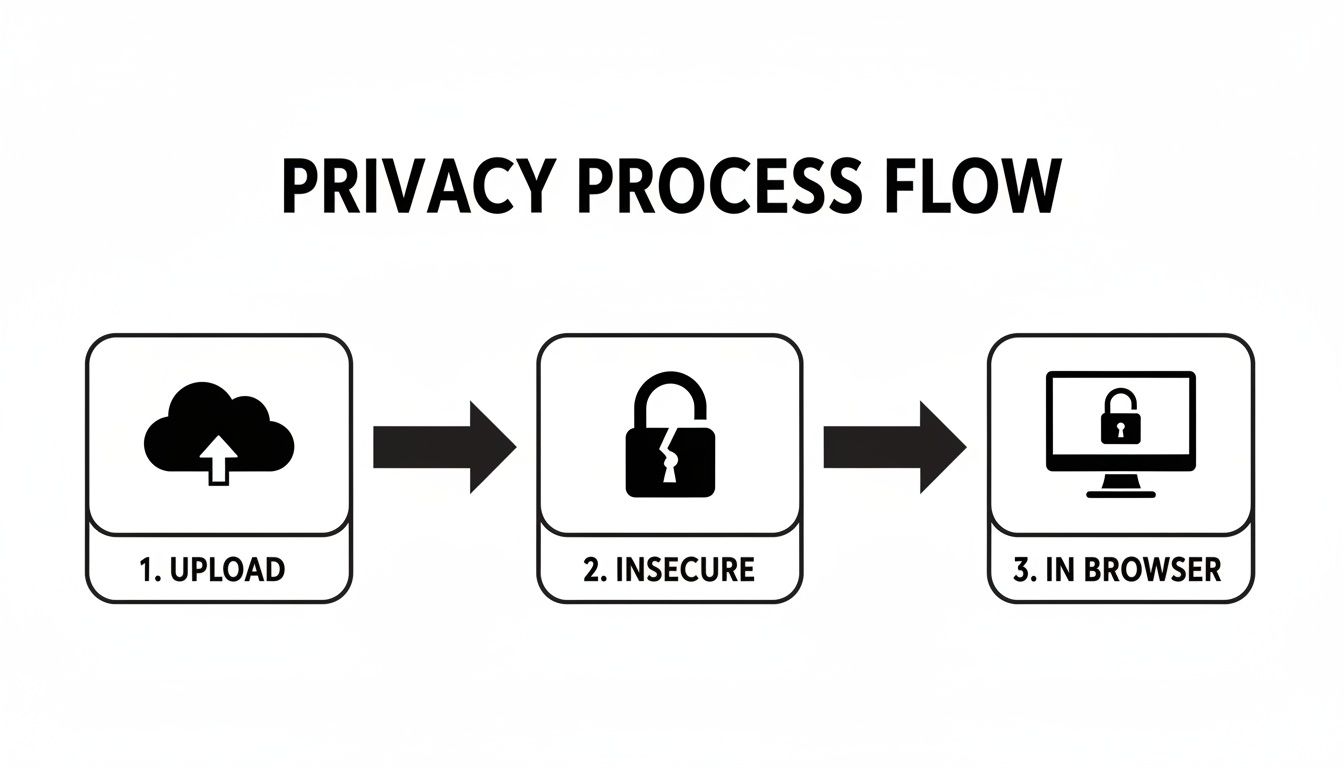
As you can see, the in-browser approach completely cuts out the risky server step, keeping your data safely on your machine where it belongs.
Getting the Dimensions and Aspect Ratio Just Right
Once your image is loaded, you get granular control over its final size. From my experience, any good tool gives you two main ways to do this:
- By Pixels: Need an image to fit a specific container on your website? Just type in the exact width and height. This is my go-to for web assets that have strict requirements, like a 1280x720 YouTube thumbnail or a 300x250 ad banner. It takes the guesswork out of it.
- By Percentage: This is perfect for quickly scaling down a large photo without doing any math. If you just need a smaller version for an email or a blog post, just type in 50% to cut the dimensions in half.
Now, here’s the most important feature you should never ignore: the aspect ratio lock. Always keep this turned on. It’s what prevents your image from getting stretched or squashed into a distorted mess. When you change the width, the height will automatically adjust to keep the original proportions intact. It’s a simple checkbox that saves a ton of headaches.
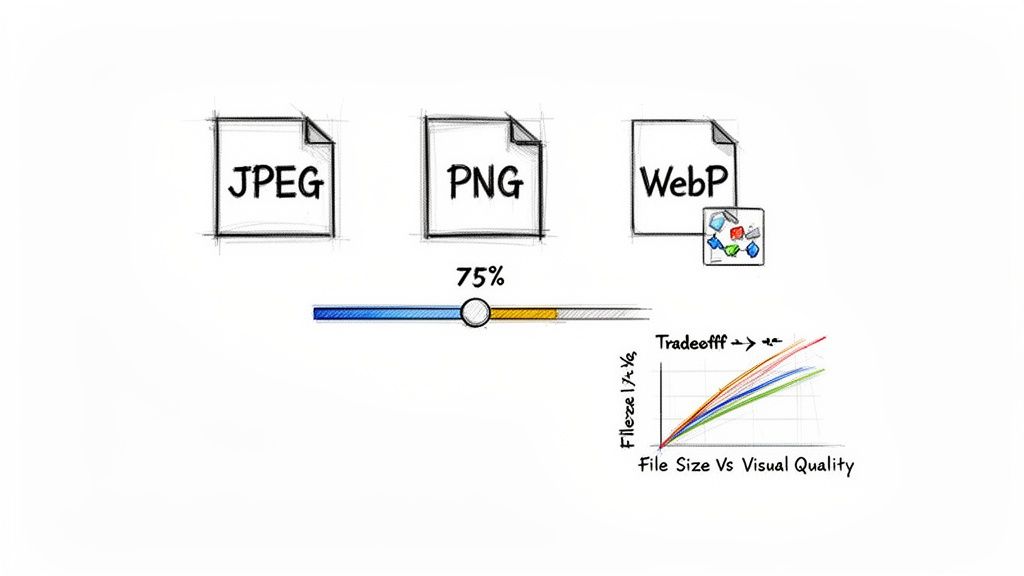
Choosing the Best Output Format and Quality
With the dimensions set, your next move is picking an output format. This choice is a constant balancing act between file size, image quality, and what you’ll be using the image for.
Here’s a quick breakdown:
- JPEG (JPG): This is the workhorse for photographs and any complex images with millions of colors. It uses lossy compression, which cleverly throws away a little bit of data to make file sizes much smaller.
- PNG: The perfect choice for graphics with sharp lines, text, or transparent backgrounds—think logos, icons, and diagrams. PNG uses lossless compression, so it keeps every single pixel of data, but the tradeoff is usually a larger file. For smaller brand assets like favicons, it's also worth looking into specialized tools. In fact, you might find our guide on how to create a favicon with a free favicon generator helpful.
- WebP: This is the modern format from Google that really shines on the web. It delivers fantastic compression that often beats both JPEG and PNG, and it can handle both lossy and lossless modes, plus transparency. It’s a versatile powerhouse for performance.
The quality slider is your secret weapon for optimization. For JPEGs and WebPs, I've found that a quality setting somewhere between 70-85% is the sweet spot. It dramatically shrinks the file size with almost no noticeable drop in visual quality.
You really have to play around with this setting to see what works. A big, beautiful hero image on a homepage might need a higher quality setting. But for a gallery of small thumbnails? You can be much more aggressive with the compression to make sure the page loads in a flash. A good resizer gives you that fine-tuned control, letting you make the perfect tradeoff every single time.
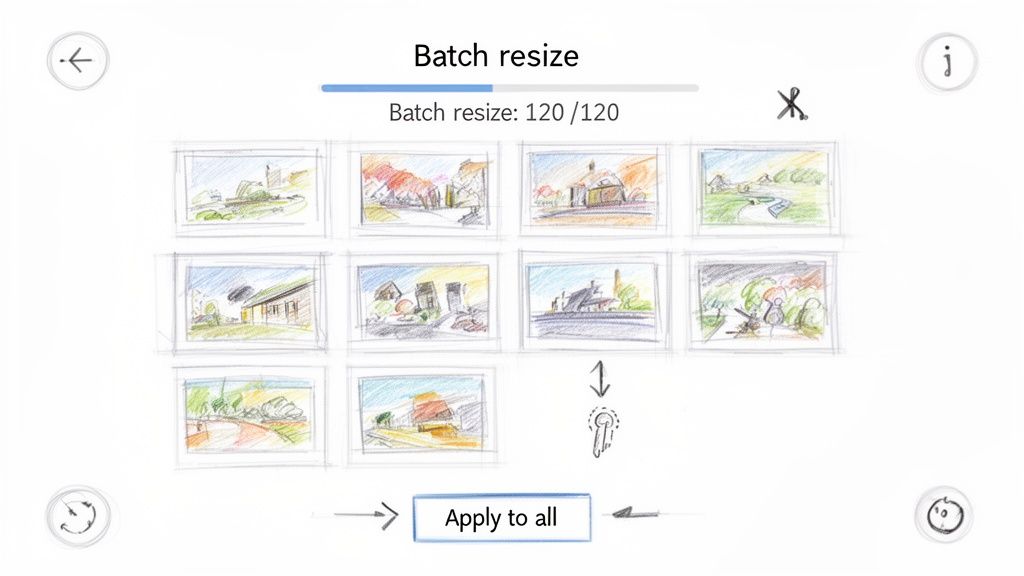
Streamline Your Workflow with Batch Image Resizing
Let's be honest: resizing images one by one is a soul-crushing waste of time. When you're working at scale, that kind of manual adjustment is a productivity killer. The real magic of a modern image online resizer is its ability to chew through entire folders of files at once, turning a tedious slog into a task that's over in seconds.
This is where batch processing saves the day. Imagine you're a developer prepping an image gallery for a new website. You've got a folder with a hundred high-resolution photos that all need to be a consistent 1080 pixels wide. Instead of the open-resize-save-repeat dance, you just grab the whole folder and apply the rule. Done. The tool crunches through every image right there on your device, keeping your files private and the process lightning-fast.
This browser-based approach completely sidesteps the old bottlenecks of cloud services. There’s no waiting around for hundreds of megabytes to upload, no twiddling your thumbs while a remote server processes them, and no downloading them all over again. Everything happens locally, using the power of your own machine.
Where Batch Resizing Really Shines
The applications for batch resizing pop up everywhere in professional workflows. It's more than just a convenience—it's a critical tool for getting things done efficiently. For anyone looking to get smarter with their time, figuring out how to batch resize images is a huge win.
Just think about these common scenarios:
- E-commerce Product Catalogs: An online store manager gets a huge batch of new product photos. For each of the 200 products, they need a main image (1200x1200 pixels), a thumbnail (300x300 pixels), and a gallery view (800x800 pixels). Batch processing knocks this out in a single operation.
- Blog Post Illustrations: A content creator is prepping images for a long article and needs to keep page load speed in check. They can resize the whole set to a 900-pixel max-width and apply a 75% quality setting to shrink file sizes without a ton of manual effort.
- Marketing Campaign Assets: A marketing team needs visuals for a campaign across multiple platforms. They can take one set of high-quality images and instantly generate optimized versions for Facebook, Instagram stories, and email headers, all with their own unique dimensions.
This capability is a big reason why so many pros rely on our free image resizer for their daily grind.
Batch processing isn't just a time-saver; it’s about locking in total consistency. When every image in a gallery or on a product page is perfectly uniform, it creates a polished, professional experience that builds trust and makes your brand look sharp.
Kicking Off a Batch Resizing Job
Getting a batch job running is incredibly simple. You start by selecting all the files you need—or just drag and drop an entire folder. Once they’re loaded, you define one set of rules that will apply to every single image.
Typically, you'll set things like:
- Dimension Rules: Define a maximum width or height, or simply scale everything down by a certain percentage.
- Output Format: Choose a consistent format for the whole batch, like JPEG for photos or WebP for better web performance.
- Quality & Compression: Apply a single compression setting across the board to find that sweet spot between file size and image clarity.
Once you’ve got your settings dialed in, you hit the "go" button. The tool gets to work, processing each file locally. When it's finished, it neatly packages all your resized images into a single ZIP file for you to download. What could have taken hours of mind-numbing work is condensed into just a few clicks.
Advanced Techniques for Image Optimization
Getting beyond simple resizing is where you'll find some serious performance wins. For developers and other pros, real optimization is about striking a careful balance between the image format, its quality settings, and the final file size. Nailing these details is the secret to building fast, responsive web experiences that keep users happy and search engines paying attention.
A good image online resizer isn't just about changing dimensions; it's about making smart decisions for every single asset. The format you pick, for instance, determines how an image gets compressed and displayed, and each one has its own set of strengths.
This is more than just a technical choice—it has a direct line to your site's performance. If you want to dive deeper into how this impacts e-commerce stores and SEO, there are some great guides that explain how to optimize images for the web.
Finding the Sweet Spot with Compression
One of the most powerful tools in your arsenal is the quality slider, which you’ll find for lossy formats like JPEG and WebP. When you set an image to "75% quality," you're essentially telling the compression algorithm how much visual information it’s allowed to throw away to shrink the file size.
It’s a common myth that anything less than 100% quality will look terrible. The truth is, settings between 70-85% often result in images that look identical to the original to the naked eye, but are a fraction of the size. It's not unusual to see a 2MB photograph shrink to under 300KB with just a bit of smart compression, and that drastically slashes load times.
The real goal here is to find the lowest quality setting where you can't see any difference. That's the optimization sweet spot: maximum file size reduction with zero noticeable drop in quality for the user.
Choosing the Right Format for the Job
Picking the right format is a strategic move that depends entirely on what the image contains and how you plan to use it. Here’s a quick rundown to help you make the right call every time:
- JPEG: This is your workhorse for photographs and any complex images with lots of colors. Its lossy compression is fantastic at shrinking down large photos without much fuss.
- PNG: The only real choice when you need a transparent background, like for logos, icons, or interface elements. PNG uses lossless compression, which keeps sharp lines and text perfectly crisp, though the file sizes tend to be larger.
- WebP: This is the modern format built for the web. It delivers better compression than both JPEG and PNG, supports transparency, and is incredibly versatile. It's become the default format for anyone serious about web performance.
This drive for performance is creating huge demand. The online image optimization software market is on track to hit $11.5 billion by 2033, all because faster websites are no longer optional. With e-commerce sales reaching $6.3 trillion in 2024, every millisecond matters—a mere 1-second delay can drop conversions by 7%. Using an efficient, client-side resizer is a smart play for anyone trying to compete in this environment.
Why Businesses Are Moving Image Editing Into the Browser
It might seem like a small technical choice, but shifting from cloud-based platforms to a browser-based image online resizer is a serious strategic move for many companies. It's about taking back control over security, ensuring compliance, and giving a real boost to team productivity.
When your team handles images entirely within their browser, nothing ever leaves your company's secure network. For businesses in regulated industries, this is huge. It means you can work with sensitive images while staying fully compliant with privacy laws like GDPR and HIPAA, because no customer or proprietary data ever hits a third-party server.
Getting the Same Results, Every Single Time
One of the most underrated benefits is achieving deterministic results. This is a fancy way of saying that if you resize an image with certain settings, you’ll get the exact same output every single time. No surprises.
Cloud services, on the other hand, can be a black box. The provider might update their compression software or change server configurations without notice, leading to subtle, frustrating inconsistencies in your images. For teams where precision is everything, that’s a deal-breaker.
- For Brand Managers: This consistency ensures every logo, banner, and product photo is processed with identical specifications. That means color profiles are preserved and quality never wavers, protecting brand integrity across all channels.
- For Developers: It allows them to build reliable automated workflows. They can count on predictable image outputs, which helps prevent unexpected layout shifts or performance hits from files that are suddenly larger or smaller than expected.
Ultimately, this level of reliability cuts down on variables, simplifies the QA process, and saves a ton of time on rework.
A Clear Win for Productivity and Data Control
The moment you cut out the upload-wait-download cycle, the productivity gains are obvious. Tasks that used to take several minutes are suddenly done in seconds. This effect is magnified when you're resizing hundreds of images at once—a local batch process can save hours compared to waiting in a slow server queue.
By keeping all processing on the client side, organizations retain complete data sovereignty. This isn't just about avoiding a data breach; it's about maintaining absolute control over your intellectual property and operational data.
The market for advanced photo editing tools is exploding, but so are the risks. With 42% of AI editing spend now coming from enterprises, the threat of data leaks from cloud tools is a growing concern, with projections showing over 1,200 incidents by 2025.
In stark contrast, offline tools have been shown to boost team productivity by an estimated 25%. They also help businesses steer clear of steep regulatory penalties like CCPA fines, which can average $7,500 per violation, simply by keeping sensitive data off the web. You can dive deeper into these trends in a detailed photo editing software market analysis from Technavio.
At the end of the day, opting for a browser-based tool is an investment in a smarter, safer, and more efficient way of working. It's a simple change that delivers significant returns.
Common Questions About Resizing Images in Your Browser
Even with all the benefits laid out, I get it—switching to a new kind of tool always brings up a few questions. When it comes to using an image online resizer that does all its work right in your browser, a few concerns tend to surface right away. Let’s tackle them head-on.
Is an Image Resizer That Works Offline Actually Secure?
Without a doubt. In fact, its security is its biggest advantage. Because all the resizing happens locally on your machine using JavaScript, your images are never uploaded or sent to any server.
This single design choice sidesteps the biggest security risks entirely. There's no chance of your files being intercepted while traveling across the internet or getting exposed in a data breach on some third-party server. If you're working with sensitive client materials, unreleased product shots, or private photos, this is the safest way to handle them. Your files never leave your computer.
The core idea is simple: what isn't uploaded can't be stolen. Browser-based tools remove the single biggest point of failure in traditional online utilities—the server itself.
Can It Really Handle Large Files or Batch Jobs Without Crashing?
Yes, and you might be surprised to find it's often much faster than tools that require an upload. Modern web browsers are incredibly powerful pieces of software, and a well-built image online resizer puts your computer’s own processing power to work.
This direct access to local resources means it can chew through massive, high-resolution photos and even batch jobs with hundreds of images without a problem. The whole process feels incredibly fast because it skips the two most time-consuming steps: uploading your files and then downloading the results. Your internet connection speed becomes irrelevant; the only limit is your own computer's capability, which is usually more than enough.
What's the Difference Between Resizing and Compressing?
This is a great question because people often mix these two up, but they're fundamentally different processes. Getting this right is the secret to properly optimizing your images.
Resizing changes the actual dimensions of an image—its pixel width and height. When you make an image smaller, you are literally throwing away pixel data to reduce how much space it takes up on a screen.
Compressing focuses on reducing the file size (the kilobytes or megabytes) by cleverly removing redundant information from the image data. This is what you control with a "quality" setting or slider.
For the best results, you need to do both. The ideal workflow is to first resize your image to the exact dimensions needed for its final destination. Then, you apply just the right amount of compression to shrink the file size for fast loading, without sacrificing too much visual quality.
At Digital ToolPad, we're all about building tools that put your privacy and efficiency first. Our entire suite of utilities runs 100% in your browser, giving you powerful, predictable results without ever asking you to hand over your data. Try our tools today and see what a faster, safer workflow feels like.
Learn more at https://www.digitaltoolpad.com.